SAS 的 ODS 系統通常是拿來把報表另存成新的資料或者是列印出比較精緻的格式出來。但大多數的人可能不知道 ODS 還可以像 Word 一樣編輯報表,舉凡加上顏色、字型粗細大小、甚至是上標下標、放特殊符號,通通可以在 ODS 裡面完成。Cynthia L. Zender 於 SAS Global Forum 2007 發表的技術文件教導使用者如何來完成這些動作。
在決定使用 ODS 來編輯文件時,必須先宣告要使用哪種特殊符號來命令 ODS 開始進行一些動作。這個宣告得用 ods escapechar 來完成。比方:
ods escapechar='^';
ods escapechar='~';
ods escapechar='#';
接下來的範例接使用「^」符號來命令 ODS 編輯文件。
範例一:編輯文字
一個很簡單例子。假設要列印出某個字串變數,資料如下所示:
data use_esc;
  length var1 $200;
  var1 = "The quick brown fox";
  output;
run;
ods html;
proc print data=use_esc;
run;
ods html close;
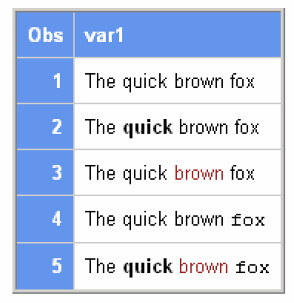
則 ODS 只會印出下面這種相當單調的結果:

下面的程式將可改變字體的粗細、字型和字的顏色:
data use_esc;
  length var1 $200;
  var1 = "The quick brown fox";
  output;
  var1 = "The ^S={font_weight=bold}quick ^S={} brown fox";
  output;
  var1 = "The quick ^S={foreground=brown}brown ^S={}fox";
  output;
  var1 = "The quick brown ^S={font_face='Courier New'}fox ^S={}";
  output;
  var1 = "The ^S={font_weight=bold}quick ^S={}" ||
  "^S={foreground=brown}brown ^S={}"||
  "^S={font_face='Courier New'}fox ^S={}";
  output;
run;
ods html style=sasweb;
ods escapechar='^';
proc print data=use_esc;
run;
ods html close;
首先,在原先的 data step 裡面加上紅色部分的程式碼。其中,「^」就是用來宣告之後的 ODS 要進行某些動作。S={} 即是用來編輯。以第一個紅色程式碼來看,^S={font_weight=bold} 接在 quick 前面即是要讓 quick 變成粗體的 quick。第二個紅色程式碼 ^S={foreground=brown} 是將 brown 的顏色變更為棕色的 brown。第三個紅色程式碼 ^S={font_face='Courier New'} 即是變更 fox 的字型為 Courier New 的 fox。所有的動作完成後都必須要在後面加上 ^S={},ODS 才會停止編輯。如果沒有 ^S={} 來中斷,則之前所宣告的編輯動作將會繼續套用在後面的內容中。第四個紅色程式碼比較複雜,這是將前三個紅色程式碼合併。此處將 quick, brown 和 fox 拆成三段,編輯過後用連接符號「||」將結果串起來。但根據我自己試驗的結果,不需要那麼麻煩,直接寫成下列的程式碼也可以做出同樣的效果:
var1 = "The ^S={font_weight=bold}quick ^S={} ^S={foreground=brown}brown ^S={} ^S={font_face='Courier New'}fox ^S={}";
最後,在宣告 ods html 之後,不要忘了加上 ods escapechar='^' 來讓 ODS 知道之前使用的「^」符號是要叫 ODS 做一些編輯動作。
執行後的結果如下所示:
範例二:加上特殊符號
特殊符號的通常用在數學方程式、註解、或化學式裡面。而使用方式也不像編輯文字一樣要用 ^S={options} 來宣告,而只要用 ^={options} 即可。假設想要做出下面這種表格:
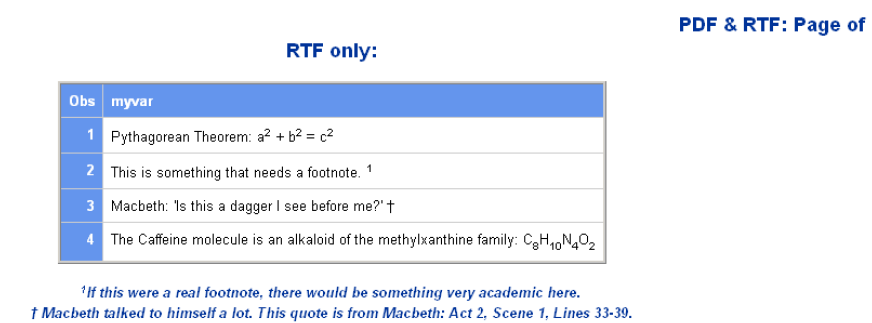
則可使用下列程式:
data sup_sub;
  length myvar $200;
  myvar = "Pythagorean Theorem: a^{super 2} + b^{super 2} = c^{super 2}";
  output;
  myvar = "This is something that needs a footnote. ^{super 1}";
  output;
  myvar = "Macbeth: 'Is this a dagger I see before me?' ^{dagger}";
  output;
  myvar = "The Caffeine molecule is an alkaloid of the methylxanthine family: " ||
  "C^{sub 8}H^{sub 10}N^{sub 4}O^{sub 2}";
  output;
run;
ods html file='inline2.html' style=sasweb;
ods rtf file='inline2.rtf' notoc_data;
ods pdf file='inline2.pdf';
ods escapechar='^';
proc print data=sup_sub;
  title j=r 'PDF & RTF: Page ^{thispage} of ^{lastpage}';
  title2 j=c 'RTF only: ^{pageof}';
  footnote '^{super 1}If this were a real footnote, there would be something very                            academic here.';
  footnote2 '^{dagger} Macbeth talked to himself a lot. This quote is from Macbeth: Act 2, Scene 1, Lines 33-39.';
run;
ods _all_ close;
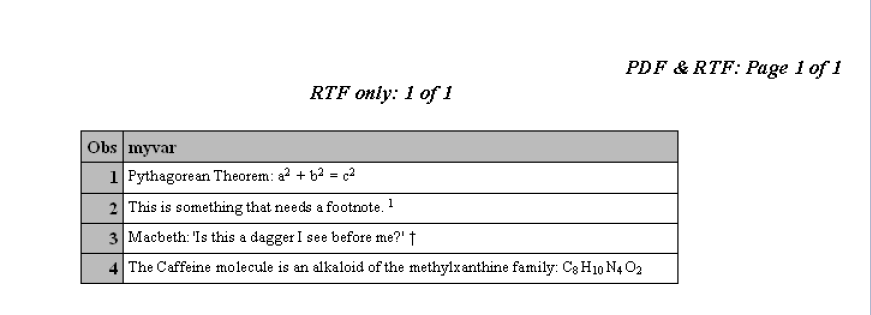
在第一個紅色程式碼中,畢氏定理需要在 a, b, c 各上標一個「2」,這個動作用 ^{super 2} 即可完成。換句話說,super 這個指令在 ^{} 裡面就是拿來做上標用的。第二個紅色程式碼同樣也是要將最後的 1 給上標,所以使用 ^{super 1} 來完成。第三個紅色程式碼同樣也是要加上一個特殊符號當作註解符號。而這個小小的十字架需要使用 ^{dagger} 才能呼叫出來。第四個紅色程式碼是要編輯一個化學方程式,讓一些數字在英文字旁邊坐下標,所以這個動作就得用 ^{sub n} 來完成。接著看最後 proc print 裡面的紅色程式碼。裡面用兩個 title 指令和 footnote 指令來完成表格標題和註解的動作。其中,在 title 裡面,^{thispage} 和 ^{lastpage} 只會作用於 ods rtf 或 ods pdf 裡面。這兩個指令會自動將整份文件的頁數已經該頁是屬於第幾頁列印出來。但這個功能在 ods html 顯示不出來。所以 ^{thispage} 和 ^{lastpage} 在 html 報表裡面會變成空白。同樣地,title2 是讓標題顯示這屬於整份文件的第幾頁,使用 ^{pageof} 來執行。可是這個指令只能在 rtf 文件裡面才會有作用,在 pdf 裡面將會把 ^{pageof} 原封不動地印出來,但在 html 文件裡面則會變成空白。
這是 rtf 文件的結果:
這是 pdf 文件的結果:

範例三:折行
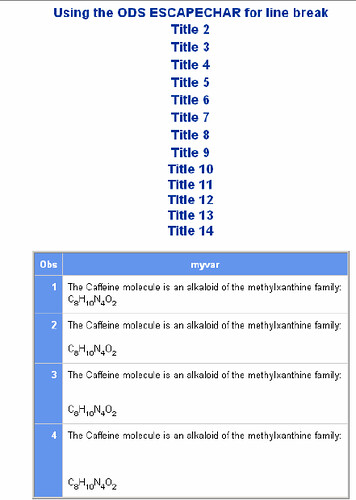
如果一串文字太常,如上例的第四個化學方程式,則可使用折行的指令來讓字串在某處斷行。這個動作只要簡單地在宣告符號後面加上個「n」或「an」(a=任意數字)即可。程式如下:
data linebr;
  length myvar $200;
  myvar ="The Caffeine molecule is an alkaloid of the methylxanthine family: ~n" ||
" C~{sub 8}H~{sub 10}N~{sub 4}O~{sub 2}";
  output;
  myvar ="The Caffeine molecule is an alkaloid of the methylxanthine family: ~2n" ||
" C~{sub 8}H~{sub 10}N~{sub 4}O~{sub 2}";
  output;
  myvar ="The Caffeine molecule is an alkaloid of the methylxanthine family: ~3n" ||
" C~{sub 8}H~{sub 10}N~{sub 4}O~{sub 2}";
  output;
  myvar ="The Caffeine molecule is an alkaloid of the methylxanthine family: ~4n" ||
" C~{sub 8}H~{sub 10}N~{sub 4}O~{sub 2}";
  output;
run;
ods listing;
ods html file='inline3.html' style=sasweb;
ods rtf file='inline3.rtf' notoc_data;
ods pdf file='inline3.pdf';
ods escapechar='~';
proc print data=linebr;
  title 'Using the ODS ESCAPECHAR for line break';
  title2 'Title 2';
  title3 'Title 3';
  title4 'Title 4';
  title5 'Title 5';
  title6 'Title 6';
  title7 'Title 7';
  title8 'Title 8';
  title9 'Title 9';
  title10 'Title 10 ~n Title 11 ~n Title 12 ~n Title 13 ~n Title 14';
run;
ods _all_ close;
為了與前兩例做一點區別,此例將宣告符號「^」改成「~」。在 data step 裡面,分別將 The Caffeine molecule is an alkaloid of the methylxanthine family: 和 化學方程式之間各斷一、二、三、四行,因此只要在冒號後面打上「~n」,「~2n」,「~3n」,「~4n」即可。設定完後不要忘了在 proc print 前面加上 ods escapecha='~'; ,否則之前的宣告不會被執行。至於下面很多 title 指令是要展示折行的效果。如果不使用折行,折需要連續呼叫 titlen statement。但有了折行指令,則只需要打一行,裡面再連續使用數個 ~n 即可(如最後的紅色程式碼所示)。僅列出 html 的結果如下:
例四:更改欄位設定
以 ods html 來說,如果沒有特別的設定,則一般的輸出報表會像下圖所示:

如果想要將整行從第一個 Sales 處斷行,並把 Sales Total Sales 改成斜體的話,可使用下列程式碼:
ods html style=sasweb;
ods escapechar='^';
proc means data=sashelp.shoes sum min mean max;
  class Region;
  var Sales;
  label Sales='^S={font_style=italic}^nShoe Sales';
run;
ods html close;
紅色部分就是用來更改那個表格內標籤的設定。^S={font_style=italic} 是用來將後面的 Total Sales 改成斜體字。而緊接著的 ^n 就是用來斷行的。結果如下:

範例五:特殊符號
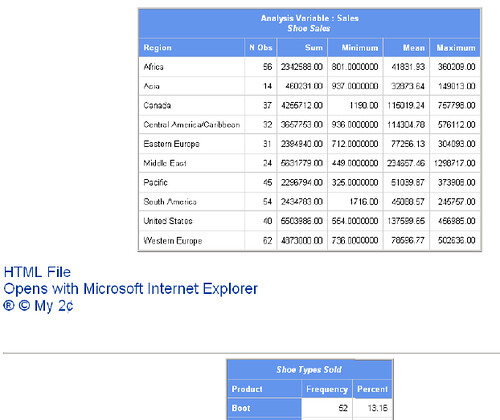
有些特殊符號需要使用特定的指令來印出。承上例,我們想要在表格後面加上註腳,並打上 trade mark、copy right mark 和美分符號,程式如下:
data _null_;
  hexcode = 'AE'x;
  call symput ('hexreg',hexcode);
  hexcode1 = 'A9'x;
  call symput('hexcopy' , hexcode1);
  hexcode2 = 'A2'x;
  call symput('hexcent', hexcode2);
run;
  ** Display the hex codes in the SAS log;
%put hexreg= &hexreg;
%put hexcopy= &hexcopy;
%put hexcent= &hexcent;
ods html file='inline5.html' style=sasweb;
ods rtf file='inline5.rtf' notoc_data startpage=no;
ods pdf file='inline5.pdf' startpage=no;
ods escapechar='^';
ods noptitle;
proc means data=sashelp.shoes sum min mean max;
  class Region;
  var Sales;
  label Sales='^S={font_style=italic}^nShoe Sales';
run;
ods pdf text="^S={just=c font_size=18pt}PDF File^nOpens with Adobe Reader^n
&hexreg &hexcopy My 2&hexcent";
ods rtf text="^S={just=c font_size=18pt}RTF File^nOpens with Microsoft Word^n
&hexreg &hexcopy My 2&hexcent";
ods html text="^S={just=c font_size=18pt}HTML File^nOpens with Microsoft Internet
Explorer^n &hexreg &hexcopy My 2&hexcent";
proc freq data=sashelp.shoes;
  tables Product /nocum;
  label Product='^S={font_style=italic}Shoe Types Sold';
run;
ods _all_ close;
使用者必須先用一個 _null_ 的 data step,呼叫 %symput 函式把這三個特殊符號叫進來。這三個特殊符號在 SAS 系統裡都有自己的代稱,trade mark 的代碼是 'AE'x,copy right mark 的代碼是 'A9'x,而美分的代碼是 'A2'x。然後用 %put 指令把剛剛用 %symput 叫進來的三個代碼設定為巨集參數,供之後使用。而那些註解可以直接寫在 ods 後面,使用 text 來印出,而所有諸如編輯文字、斷行以及安插特殊符號的指令全部都可以在 text 後面使用。以 ods html 來講, ^S={just=c font_size=18pt} 即是設定整個註腳的字型大小為 18pt,並且全部置中。放在 File 和 Opens 中間的 ^n 即表示從這個位置斷行,最後使用 &hexreg、&hexcopy 和 &hexcent 把 trade mark, copy right mark 和美分符號安插進去。結果如下:
範例六:安插圖片
ODS 也可以拿來安插圖片。先看看程式:
proc format;
  value $prdimg 'Boot' = 'c:\temp\boot.jpg'
                "Women's Dress" = 'c:\temp\dressheels.jpg'
                'Slipper' = 'c:\temp\slipper.jpg';
run;
ods html file='inline6.html' style=sasweb;
ods rtf file='inline6.rtf' notoc_data;
ods pdf file='inline6.pdf';
ods escapechar='^';
proc report data=sashelp.shoes nowd style(column) = {vjust=b};
  title '^S={preimage="c:\temp\shoe_logo.jpg"}';
  where product in ('Boot', 'Slipper', "Women's Dress");
  column Product Sales N;
  define Product / group
                   style(header)={background=white foreground=black}
                   style(column)={postimage=$prdimg.};
  define Sales / sum;
  define N / '^S={background=white foreground=black}Number of Sales';
run;
ods _all_ close;
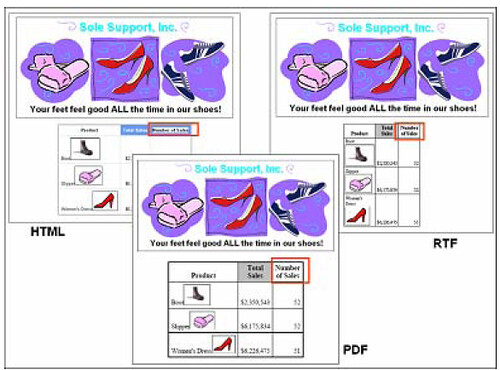
如果只要在 title 上安插圖形的話,則可簡單地於 title statement 後面加上 ^S={preimage="路徑\檔名.jpg"} 來把圖形放上。如果要在文件內容部分的話,得需要先用 proc format 把每一張圖的路徑和檔名分別設定給某個變數的不同的 value,並用一個 $prdimg 來表示(這個字串可以自行設定)。然後在 proc report 裡面的 define 後面放上選項 style(column)={postimage=prdimg.},則每一欄裡面都會安插不同的圖形。若只想單純的更改欄位背景或前景顏色的話,則使用 ^S={backgroun=color1 foreground=color2} 來改變。此例使用 ^S={background=white foreground=black} 把總數欄位的前景顏色改成黑色,背景顏色改成白色。
三種輸出格式的結果如下:
CONTACT INFORMATION
Your comments and questions are valued and encouraged. Contact the author:
Cynthia L. Zender
SAS Institute Inc.
Home Office
Las Cruces, NM 88011
Work Phone: (505) 522-3803
Fax: (505) 521-9328
E-mail: Cynthia.Zender@sas.com
沒有留言:
張貼留言
要問問題的人請在文章下方的intensedebate欄位留言,請勿使用blogger預設的意見表單。今後用blogger意見表單留言的人我就不回應了。